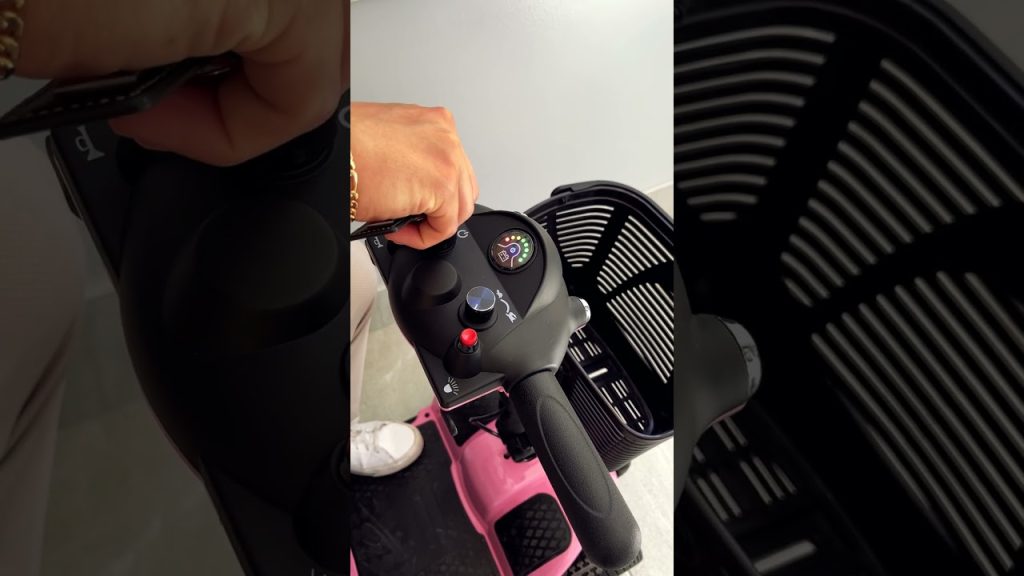
Get ready to learn how to power up your mobility scooter safely and easily. This short guide shows you how to insert the key into the tiller console and read the power indicator so you can start moving with confidence.
The included video demo from Vive Health walks through the same steps and the article adds simple safety reminders, such as removing the key when the scooter isn’t in use. You’ll also find product info (SKU MOB1027) for top sellers and quick tips to keep your ride reliable.

Preparing to Use Your Mobility Scooter
Before you take your mobility scooter out for the first time, spend a few moments preparing yourself and the machine so you can ride safely and confidently. These preparatory steps reduce the risk of surprises and help you learn the scooter’s controls at a comfortable pace.
Read the user manual thoroughly before first use
You should read the user manual carefully before you use the scooter for the first time. The manual contains model-specific instructions, safety warnings, maintenance schedules, and part numbers you’ll need down the road.
Ensure the scooter is on a flat, stable surface
Always position the scooter on a flat, stable surface for pre-trip checks and mounting. This prevents rolling or tipping while you adjust the seat, test controls, or insert the key switch.
Check that the key switch and keys are available and undamaged
Confirm that the key and key switch are present and not bent or damaged. The key is the primary on/off control, so a damaged key can leave you stranded or cause intermittent power issues.
Verify seat, armrests, and footrests are secure and adjusted for comfort
Make sure your seat, armrests, and footrests are locked into place and positioned for comfortable, ergonomic support. Proper adjustments help with balance, reach to the tiller, and overall control of the scooter.
Confirm any required paperwork or prescriptions are carried if needed for rentals or insurance
If you rented the scooter or require documentation for insurance or medical reasons, carry that paperwork with you. Having the right documents avoids delays and ensures you comply with rental or coverage terms.
Understanding the Tiller and Control Panel
Getting to know the tiller and control panel helps you operate the scooter safely and troubleshoot minor issues. Spend time identifying each control so you don’t need to guess while moving.
Locate the tiller console and identify the key switch slot
Find the tiller console and note the exact location of the key switch slot. This is where you’ll insert the key to power the scooter, and it’s helpful to be familiar with its position by touch and sight.
Identify the power indicator light and battery gauge
Locate the power indicator light and the battery gauge on the console. These tell you at a glance that the scooter is powered and how much charge you have, so you can avoid being stranded with a depleted battery.
Find the speed control dial, throttle, horn, lights, and any mode buttons
Locate the speed control dial, throttle controls, horn button, light switches, and any mode buttons before you ride. Knowing where these are prevents sudden, unsafe movements when you need to adjust speed or alert others.
Note the location of the parking brake or freewheel lever
Identify the parking brake and the freewheel or “freewheel” lever, which lets you move the scooter manually. Understanding these controls prevents accidental rolling and helps if you need to push the scooter without power.
Learn how indicators and warning lights map to user manual descriptions
Match the console’s indicators and warning lights to the descriptions in your manual. That way you can interpret battery warnings, fault codes, or maintenance alerts correctly and respond promptly.
Turning On the Mobility Scooter
Turning the scooter on is a simple but important procedure; doing it correctly ensures the scooter is ready and safe to operate. Follow each step deliberately to confirm power and readiness before you move.
Insert the key switch into the tiller console until it seats securely
Insert the key into the tiller’s key switch until it seats fully and feels secure. A fully seated key completes the electrical circuit so the scooter’s electronics will initialize properly.
Observe the power indicator illuminate to confirm power is on
After inserting the key, watch for the power indicator light to illuminate. That light confirms that the scooter’s systems have powered up and are ready for further checks.
Check the battery gauge after key insertion to confirm charge level
Once the scooter is powered on, check the battery gauge for charge level. If the battery is low, plan to recharge before you travel far to avoid being stranded mid-trip.
Select an appropriate drive mode or speed setting if applicable
If your scooter has selectable drive modes or speed settings, choose one appropriate for the environment—lower for indoors and crowded areas, higher for open outdoor travel. Start conservatively until you’ve warmed up.
Remove the key switch from the tiller console when the scooter is not in use
When you finish using the scooter, turn it off and remove the key from the tiller console. This prevents unauthorized use, accidental starts, and helps conserve battery in some models.
Battery and Power Checks
Regular battery and power checks keep your scooter reliable and extend battery life. You should build a quick routine that ensures the scooter is charged and electrical connections are intact before every trip.
Verify battery charge level using the onboard gauge before each trip
Check the onboard battery gauge before you leave. Even if you charged recently, usage, temperature, and age affect remaining range, so confirm the displayed level is sufficient for your planned trip.
Inspect battery terminals and connections for corrosion or looseness
Inspect the battery terminals and wiring connections for corrosion, frayed wires, or looseness. Clean and tighten connections as needed, because poor contacts can cause intermittent power and poor performance.
Know how to perform a full charge cycle and approximate charging times
Learn the proper charging procedure from your manual and the approximate time for a full charge. Some batteries require overnight charging while others reach full capacity in several hours; follow manufacturer guidance.
Understand how range estimates change with weight, terrain, and speed
Recognize that real-world range varies: heavier loads, hilly terrain, and higher speeds reduce range, while smooth, flat surfaces and moderate speeds maximize it. Plan trips conservatively to account for these variables.
Keep replacement battery and fuse part numbers (refer to user manual)
Record the battery and fuse part numbers from the manual so you can obtain correct replacements easily. Using specified parts ensures performance and avoids damage to the scooter’s electrical system.

Adjusting Speed, Throttle and Drive Modes
Fine-tuning speed and drive modes lets you ride comfortably and safely in different environments. Practice adjustments until you’re comfortable with how quickly the scooter responds.
Set the speed control dial to a conservative starting speed
Start with a conservative speed dial setting to build confidence. A lower setting gives you smoother acceleration and more time to react if something unexpected happens.
Practice using the throttle gently to get a feel for acceleration
Use gentle, gradual pressure on the throttle to learn how the scooter accelerates. Abrupt throttle inputs can make the scooter lurch, so practicing smooth control improves your safety and comfort.
Use lower drive modes for indoor or crowded environments
Choose lower drive modes when indoors or in crowded spaces so you can maneuver precisely and reduce the risk of collisions. Slow speeds give you better control in tight areas.
Switch to higher modes for outdoor or longer-distance use when safe
When you’re in open, safe outdoor settings and need to cover distance, switch to higher drive modes. Higher modes give you more speed and power, but be mindful of terrain and battery consumption.
Consult manual for any sport or economy modes and their implications
If your scooter has sport or economy modes, consult the manual to understand their effects on speed, torque, and battery use. Sport mode may increase responsiveness but reduce range; economy mode conserves power.
Safety Checks Before Moving
A few safety checks before you move can prevent accidents and mechanical problems. Make these checks part of your routine every time you prepare to ride.
Ensure the parking brake is released only when ready to move
Only release the parking brake when you’re ready to move. Releasing it prematurely on a slope or unstable surface can cause unwanted movement or tipping.
Confirm horn, lights, and indicators function correctly
Test the horn, lights, and any indicators before you start. These safety features help you communicate with pedestrians and drivers and increase visibility in low light.
Check mirrors and clear any obstructions to visibility
Adjust mirrors and scan the scooter’s immediate surroundings for obstructions. Remove bags, blankets, or equipment that block your view or interfere with steering.
Verify tires are inflated and tread is in good condition
Inspect tire pressure and tread condition. Properly inflated tires with good tread improve handling and range, while underinflated or worn tires can affect stability.
Make sure the path is clear of hazards and steep slopes are avoided
Plan your route to avoid hazards like loose gravel, deep curbs, and steep slopes. If you must navigate a slope, proceed slowly, straight on, and keep a safe distance from edges.

Operating the Scooter for the First Time
Your first rides should be short, controlled, and in a safe environment so you can get comfortable with acceleration, steering, and braking before tackling more challenging terrain.
Start in a quiet, open area with a caretaker or friend present
Begin practice sessions in a quiet, flat area with a friend or caregiver nearby. Having someone with you adds reassurance and immediate help if something feels wrong or you need assistance.
Practice gentle acceleration, turning, and braking maneuvers
Spend time practicing smooth starts, gentle turns, and controlled stops. Familiarize yourself with turning radius and the scooter’s braking response to avoid oversteering or abrupt stops.
Try ascending and descending a gentle slope under supervision
Under supervision, practice going up and down a gentle slope. Learn how the scooter behaves on inclines and how to maintain safe speed and posture while ascending and descending.
Practice maneuvering around common obstacles like doorways and curbs
Work on navigating common obstacles such as narrow doorways and low curbs. Practice turning sharply and approaching obstacles slowly so you build confidence in confined spaces.
Record observations and consult the manual or vendor if handling feels off
If the scooter doesn’t handle as you expect, note what felt off—such as delayed throttle response or unusual noises—and consult the manual or your vendor for guidance before continuing to use it.
Stopping, Parking, and Turning Off
Knowing how to stop and secure your scooter properly keeps you safe and protects the equipment. Follow simple steps to park responsibly and prepare the scooter for storage or transport.
Gradually reduce speed using the throttle before coming to a stop
Slow down progressively by easing off the throttle so you come to a controlled stop. Sudden braking can jolt you or cause instability, so smooth deceleration is safer.
Apply the parking brake to secure the scooter when stationary
Once stopped, apply the parking brake to secure the scooter. This prevents unintentional movement, especially on slight inclines or uneven surfaces.
Turn the key switch to the off position and remove the key when finished
Turn the key to off and remove it after parking. Removing the key prevents accidental starts and discourages unauthorized use while also conserving battery in some models.
Fold or secure removable accessories before transporting
If you’re transporting the scooter, fold or secure removable accessories like baskets, canopies, or armrests. Properly securing accessories makes the scooter easier and safer to load and reduces the risk of damage.
Park on a level surface and avoid leaving scooter on a slope
Whenever possible, park on a level surface and avoid leaving the scooter on a slope. If you must park on an incline, use extra caution with the parking brake and chock wheels if available.

Troubleshooting Common Issues
You’ll likely encounter minor issues occasionally; learning basic troubleshooting steps helps you resolve simple problems quickly and know when to seek professional service.
No power after inserting key: check battery charge and main fuse
If the scooter shows no power after inserting the key, first check the battery charge and then inspect the main fuse. A blown fuse or a fully discharged battery are common and addressable causes.
Power indicator on but scooter won’t move: inspect freewheel mode and brake
If the power indicator is on but the scooter won’t move, verify that the scooter isn’t in freewheel or neutral mode and that the parking brake is fully released. These mechanical settings often explain immobility.
Weak or erratic power: test battery connections and throttle responsiveness
If power feels weak or erratic, inspect battery connections for corrosion or looseness and test the throttle’s responsiveness. Faulty wiring or poor contact can cause intermittent power delivery.
Strange noises while driving: check tires, loose parts, and motor mounts
Unusual noises during operation can indicate loose panels, debris in the wheels, worn tires, or motor mount issues. Stop and do a visual inspection; tighten fasteners and remove obstructions where appropriate.
Consult user manual error codes and contact authorized service if problems persist
If warning lights display error codes or you can’t resolve an issue, consult the user manual for the code meanings and contact an authorized service center for repairs. Professional service prevents further damage.
Conclusion
You’ve now covered the essential steps to prepare, operate, and care for your mobility scooter safely and confidently. Routine checks, careful practice, and following manufacturer guidance will help you maintain independence and reliability with your scooter.
Insert the key into the tiller console, confirm the power indicator illuminates, and always remove the key when not in use
Always insert the key fully into the tiller console to power up, confirm the power indicator lights, and remember to remove the key when you’re finished. This simple habit prevents accidental use and helps protect your scooter.
Perform routine safety and battery checks before each trip to prevent issues
Make a quick pre-ride checklist part of your routine: battery level, tire condition, controls, and lights. Consistent checks reduce the chance of breakdowns and improve overall safety.
Practice operating in a safe environment and follow manufacturer maintenance schedules
Practice in safe, open areas until you’re comfortable, and adhere to the maintenance schedule in your manual. Regular servicing and responsible operation extend the life of your scooter.
Refer to the user manual and authorized service centers for troubleshooting and repairs
When you encounter unfamiliar warning lights or mechanical issues, consult your user manual for guidance and contact authorized service centers for repairs. Certified technicians have the right parts and expertise.
Keep safety, comfort, and legal considerations in mind to get the most reliable, independent use from your mobility scooter
Always prioritize safety and comfort, and be mindful of local regulations when using your scooter in public spaces. With regular checks, proper charging habits, and practice, you’ll get the most reliable, independent use from your mobility aid.
To turn on your mobility scooter, simply insert the key switch into the tiller console. The power indicator will illuminate to show that the power is on. Remember to remove the key switch from the tiller console when the mobility scooter is not in use.
Buy Here 👉
Don’t forget to claim your 5% OFF at Vive Health 👉
SHOP OUR BEST SELLERS👇
SKU MOB1027


